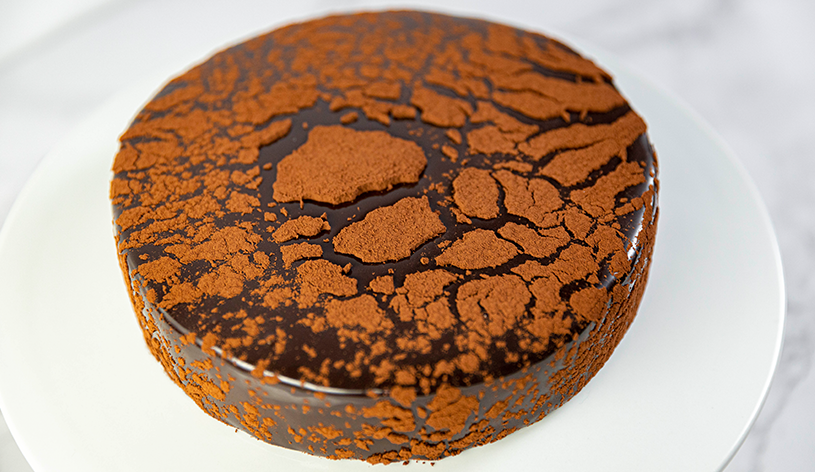
CRUNCH LAYER
120 g good quality milk couverture chocolate 33%
210 g crunchy peanut butter
40 g rice bubbles, slightly crushed
30 g candied orange fillets, finely chopped
CHOCOLATE MOUSSE
280 ml fresh cream 35% fat
50 ml water
50 g caster sugar
50 g liquid glucose
260 g good quality dark couverture chocolate 54%
CHOCOLATE GLAZE
8 gelatine sheets
336 ml fresh cream 35% fat
100 ml water
505 g caster sugar
170 g dutch processed cocoa powder, sieved
100 g liquid glucose
Pinch salt
FINISHING
30 g dutch processed cocoa powder
MOULD PREPARATION
- Cut a strip out of cardboard, 750mm in length and 50mm in height.
- Roll the cardboard into a 200mm ring and secure it with tape.
- Spray the inside of the cardboard mould with vegetable oil spray.
- Cut a strip of baking paper, 220mm in length and 50mm in height. Line the inside of the cardboard mould with the baking paper.
- Place the prepared mould onto a lined baking tray and set aside until required.
CRUNCH LAYER
- To temper the couverture chocolate, place it into a microwave-safe plastic bowl, heat in 30 second increments, stirring in between. Once you have 50% solids and 50% liquid, stir vigorously until the solids have completely melted.
- Add the peanut butter and mix to combine.
- Add in the slightly crushed rice bubbles and chopped candied orange. Mix until they are completely coated in chocolate.
- Leaving a 10mm border, spoon the crunch mixture into the prepared mould. Press down gently with the back of a spoon to level the mixture.
CHOCOLATE MOUSSE
- In the bowl of a stand mixer fitted with a whisk attachment, semi-whip the cream until it has some body but still collapses. Set aside in the refrigerator until required.
- Partially melt the dark chocolate in the microwave until you have 50% solids and 50% liquid.
- Place the water, sugar and glucose into a saucepan and bring to the boil, until the sugar has completely dissolved.
- Pour the boiled syrup over the partially melted chocolate and whisk to combine. Allow the chocolate to cool to just above body temperature.
- Mix a small amount of the semi-whipped cream through the chocolate mixture before folding through the remaining cream.
- Pour the chocolate mousse over the crunch layer. Use a palette knife to level the top.
- Place in the freezer overnight.
CHOCOLATE GLAZE
- Soak the gelatine sheets in a bowl of cold water.
- Place the cream, water, sugar and salt into a saucepan and bring to the boil.
- Add in the sieved cocoa powder and liquid glucose and whisk to combine.
- Bring to the boil before removing from the heat and transfer into a jug or bowl.
- Squeeze the excess water out of the pre-soaked gelatine before adding the gelatine to the glaze.
- Emulsify the glaze using a stick blender.
- Cover the glaze with plastic wrap touching the surface and allow to cool to between 30-31˚C.
FINISHING
- Once the glaze has cooled to between 30-31 ˚C, re-emulsify with a stick blender.
- Remove the cardboard from around the frozen cake.
- Place an overturned bowl onto a lined tray with sides. Sit the frozen cake on top of the bowl and pour the glaze over the cake.
- Immediately sieve the cocoa powder over the surface of the cake.
- Once the glaze stops dripping, use a sharp knife to trim the excess glaze from around the base of the cake.
- Transfer the cake to a serving plate and place in the refrigerator for a minimum of 4 hours before serving.
NOTES: The excess glaze can be stored in an airtight container in the freezer for up to 8 weeks. To use the glaze, reheat in the microwave. A little water can be added if the glaze is too thick.
Once glazed, the cake can be stored in the refrigerator for up to 3 days.